Warning: Trying to access array offset on value of type bool in /www/wwwroot/pesstatsdatabase.com/wp-content/plugins/Internallink-Pro/internallink-pro.php on line 276
Warning: Undefined array key 1 in /www/wwwroot/pesstatsdatabase.com/wp-content/plugins/Internallink-Pro/internallink-pro.php on line 299
Warning: Undefined array key 1 in /www/wwwroot/pesstatsdatabase.com/wp-content/plugins/Internallink-Pro/internallink-pro.php on line 299
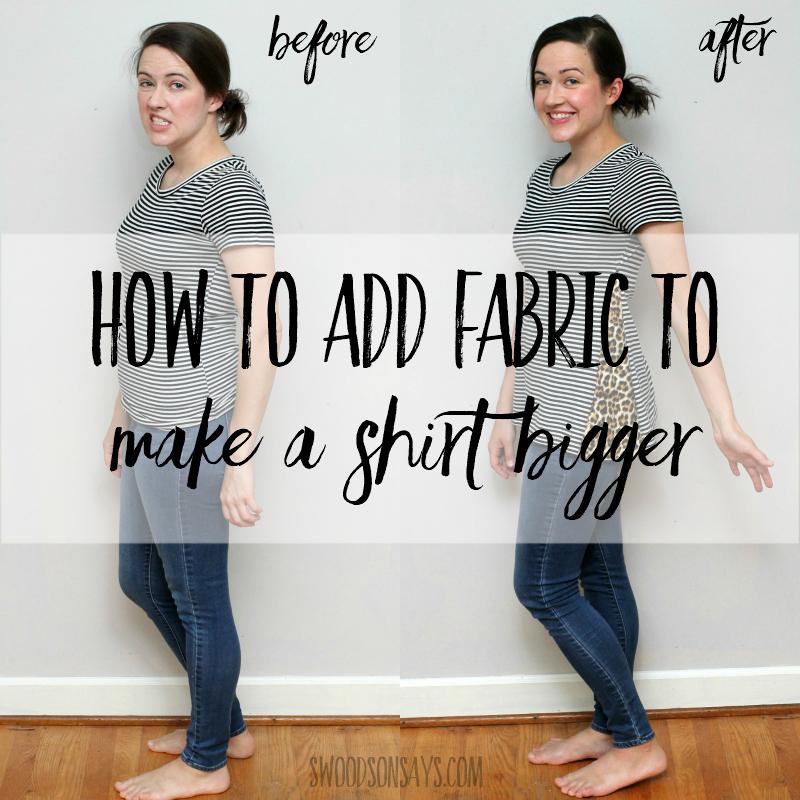
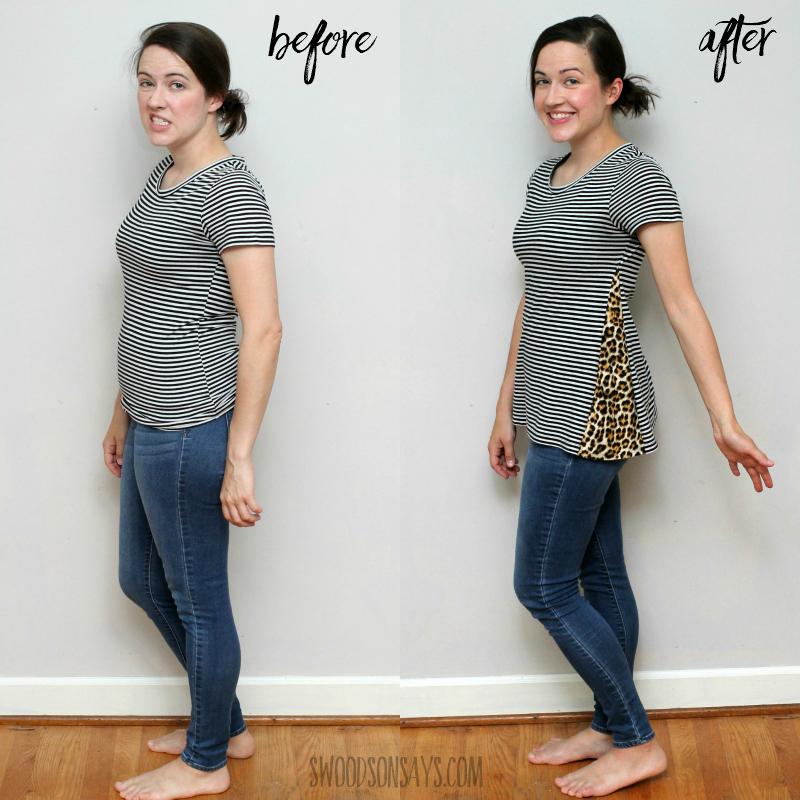
Are you tired of searching for the perfect shirt with the right fit? If so, we have a solution for you! In this tutorial, we will show you how to add fabric to a shirt to make it bigger. Whether you want to fix a too-tight shirt or simply prefer looser tops, this simple technique allows you to customize your clothing in just 30 minutes.
Revamp Your Style with a Fun Twist
Instead of searching through thrift store racks for a shirt with the perfect fit, why not pick up any shirt that catches your eye? By adding an accent fabric, such as a fun leopard print, you can create a unique shirt that suits your style. This beginner-friendly refashion tutorial will guide you through every step, making it easy for anyone to get started.
Supplies You’ll Need
To complete this project, you will need the following supplies:
- 1/4 yard of knit fabric that matches the weight of your original shirt
- HeatnBond Soft Stretch Lite Tape
- Ballpoint needles
- Coordinating thread
- Iron
- Rotary cutter
- Scissors
- Pins
- Air soluble marking pen
- Quilt ruler
Step-by-Step Instructions
Xem thêm : CEO Marc Barros là ai? Cuộc đời và sự nghiệp của CEO Marc Barros
Follow these step-by-step instructions to add fabric to your shirt:
Step 1: Cut Up the Side Seam of Your Shirt
Using scissors, cut up the side seam of your shirt. You can choose to cut all the way up to the armpit seam or stop just below it, depending on the desired fit.
Step 2: Lay Out and Trace the Insert Fabric
Lay out your insert fabric, ensuring that the stretch direction matches your shirt. Place your shirt on top of the fabric, pulling it as wide as you’d like for the desired fit. Use an air soluble marking pen to trace the opening.
Step 3: Draw the Hem Allowance
Decide on the hem allowance based on your original shirt or personal preference. Lay out fusible hem tape or measure the desired hem allowance. Trace around it to create a guideline for hemming.
Step 4: Cut Out the Fabric
Extend the traced lines past the top to add a seam allowance to each long side of the triangle you drew. Cut along the lines, ensuring a 1/2″ seam allowance.
Step 5: Create a Mirrored Pattern
Use the cut fabric as a pattern and cut a mirrored piece from the same fabric. Make sure the stretch is going in the same direction.
Step 6: Hem the Bottom of the Triangles
Xem thêm : The Best EA FC 24 Formations: Unlocking Victory on the Virtual Pitch
Hem the bottom of both triangles, aligning the hem allowance with the traced lines. This will ensure that the stitching lines match up with the original shirt.
Step 7: Sew the Insets In Place
Pin the right sides of the fabric together and sew along the seam allowance line you originally traced. Use a stretch stitch or zigzag stitch for added durability. Start with a basting stitch if you’re not confident and adjust as needed.
Step 8: Press the Seams to the Outside
Use an iron to press the seams to the outside on both sides of the shirt. This will give your project a polished finish.
Step 9: Smooth Out the Seam Allowance
If you stopped below the armpit seam, smooth out the seam allowance on the side. This will ensure a comfortable fit.
FAQs
Q: Is this a beginner-friendly project?
A: Yes, this tutorial is perfect for beginners, as it provides step-by-step instructions with accompanying photos.
Q: How long does it take to complete this project?
A: It usually takes around 30 minutes to add fabric to a shirt and achieve the desired fit.
Q: Can I use any type of fabric for the insert?
A: It is recommended to use a knit fabric that matches the weight of your original shirt for the best results.
Conclusion
Don’t let ill-fitting shirts dampen your confidence and style. With this simple tutorial, you can easily add fabric to a shirt and create a customized fit in no time. Set your creativity free and revamp your wardrobe with unique pieces that reflect your personal style.
Remember, Pesstatsdatabase offers a wealth of information for football enthusiasts. For more football-related content, visit Pesstatsdatabase. Happy sewing!
Nguồn: https://www.pesstatsdatabase.com
Danh mục: Sport